Raspberry Pi 4 Prototyping Enclosure Made From PCBs
March 22, 2022
Blog

Printed circuit boards are amazing devices, able to zip electrons from component to component with the greatest of ease. Consider, however, that PCBs are extremely tough, and can be manufactured accurately and inexpensively, to be delivered in a few days.
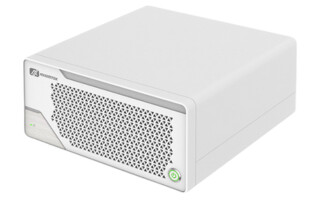
So perhaps carrying electrons is only scratching the surface of what printed circuit boards can do. For my latest JC Devices offering on Tindie, I designed the JC Pi Protec case for the Raspberry Pi 4 made out of circuit boards and standoffs. “Protec” could be short for “pro technology,” or even a variation on “prototyping,” for its available perfboard area, though if you follow along with the meme:
- It protec
- It also attac
- But most important, it has GPIO pinout on its bac
- And compatible with DIN rac
Yes, this board design fits a Pi 4, and a second PCB acts as a base with mounting holes. The top PCB includes a cutout area for the GPIO pins, space for a fan and/or heat sink, and has either a prototyping area or a smooth surface instead. Spacers are cut out on my laser, which has been an incredibly useful tool.
Unique Features
The idea for this case was simply to see if this type of design could be made with a PCB. However, the end result includes some interesting and unique features:
- GPIO Pinout printed on silk screen: This has been fantastic, and actually even more useful than I thought it would be. While references like pinout.xyz are great, it’s even better if the reference is right there already!
- Prototyping Area: Perhaps you want to add an LED to your Pi setup, or a transistor, or any other simple combination of components. This little perfboard area allows you to do this with a minimum of hassle and wiring.
- Fan Accommodation: This isn’t the first case to have a fan, but as far as I know, my design is different than what’s out there. Instead of round holes for screws it has slots, theoretically allowing it to use different sized fans, and the square area in the middle accommodates a heat sink.
- Multiple Mounting Options: Screw holes are included on the bottom and DIN rail adapters are available. Rubber bumpers are included in the components kit, and four mounting holes allow for a more solid fixturing. Future plans include dedicated zip-tie cutouts.


The board was designed in Fusion 360, exported as a DXF, then pulled into KiCad via the File – Import – Graphics dialog. I prototyped this PCB with my laser cutter which provided near-instant feedback, and helped me produce a usable board on the first try.
Other Novel PCB Uses?
Of course, I’m not the only one to think of using PCBs this way. Stephen Hawes shows off how he used one as an indexing wheel in the clip below. He even took advantage of the plated surfaces in order to enhance reflection, results of which are shown around the 5:45 mark.
You can find PCB art on Tindie that has little to do with actual electronics, and other devices–like this three-dimensional MiG-29 model with LEDs, or this terminator-like robot head–transmit power, but are perhaps more art than circuitry. Personally, I love when I can make devices that are both beautiful and functional at the same time as I tried to do with my JC Pro Macro 2 rotary input.
It’s truly amazing what one can do with electronic design automation (EDA) knowledge, plus a bit of creativity. If you are on the fence about getting into this pursuit, I’d definitely recommend trying it out. The cost of entry is low, and you never know what opportunities it will open up.
Jeremy Cook is a freelance tech journalist and engineering consultant with over 10 years of factory automation experience. An avid maker and experimenter, you can follow him on Twitter, or see his electromechanical exploits on the Jeremy Cook YouTube Channel!