Managing Internet Connections on Linux Devices with ConnMan
October 24, 2017
Product

Connection Manager (ConnMan) is a connection management daemon (connmand) for managing Internet connections within devices running the Linux operating system.
Connection Manager (ConnMan) is a connection management daemon (connmand) for managing Internet connections within devices running the Linux operating system. It offers low memory consumption with a fast, coherent, synchronized reaction to changing network conditions.
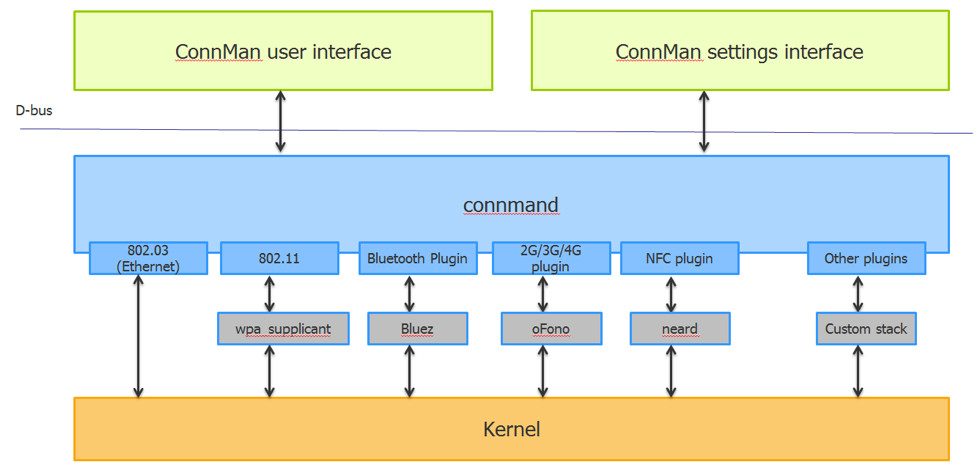
ConnMan has various plug-ins and is a fully modular system that can be extended to support all kinds of wired or wireless technologies. The plug-in approach allows for easy adaption and modification for various use cases. Configuration methods like DHCP and domain name resolving are implemented using plug-ins.
All applications should use D-Bus to communicate with ConnMan. It is used with the embedded Yocto build system, is part of the GENIVI In-Vehicle-Infotainment specification.
ConnMan is distributed under the GPL v2.0 license. Intel is the main contributor to the ConnMan project.
ConnMan architecture
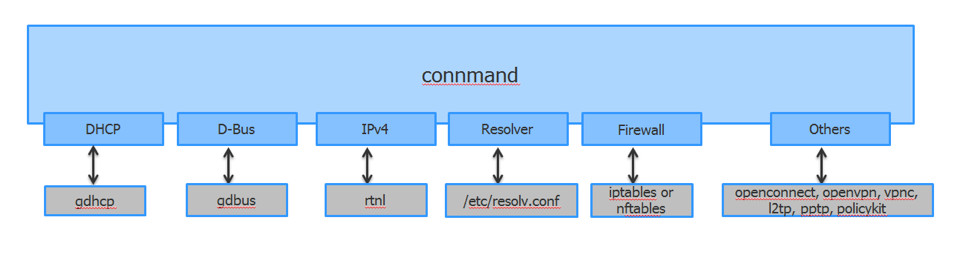
ConnMan internal infrastructure
Functionality and features
The following features are built-in into Connection Manager:
- Generic plugin infrastructure
- Device and network abstraction (with basic storage support)
- IPv4, IPv4-LL (link-local) and DHCP - IPv6, DHCPv6 and 6to4 tunnels
- Advanced routing and DNS configuration
- Built-in DNS proxy and intelligent caching
- Built-in WISPr hotspot logins and portal detection
- Time and timezone configuration (manual and automatic with NTP)
- Proxy handling (manual and automatic with WPAD)
- Tethering support (USB, Bluetooth and WiFi AP mode)
- Detailed statistics handling (home and roaming)
Various plugins can be enabled for networking support:
- Ethernet plugin
- WiFi plugin with WEP40/WEP128 and WPA/WPA2 (personal and enterprise)
- Bluetooth plugin (using BlueZ)
- 2G/3G/4G plugin (using oFono)
Pugins with additional features are also available:
- Loopback interface setup
- PACrunner proxy handling
- PolicyKit authorization support
Connman D-BUS interface
D-Bus interfaces
- Applications should use D-Bus to communicate with ConnMan.
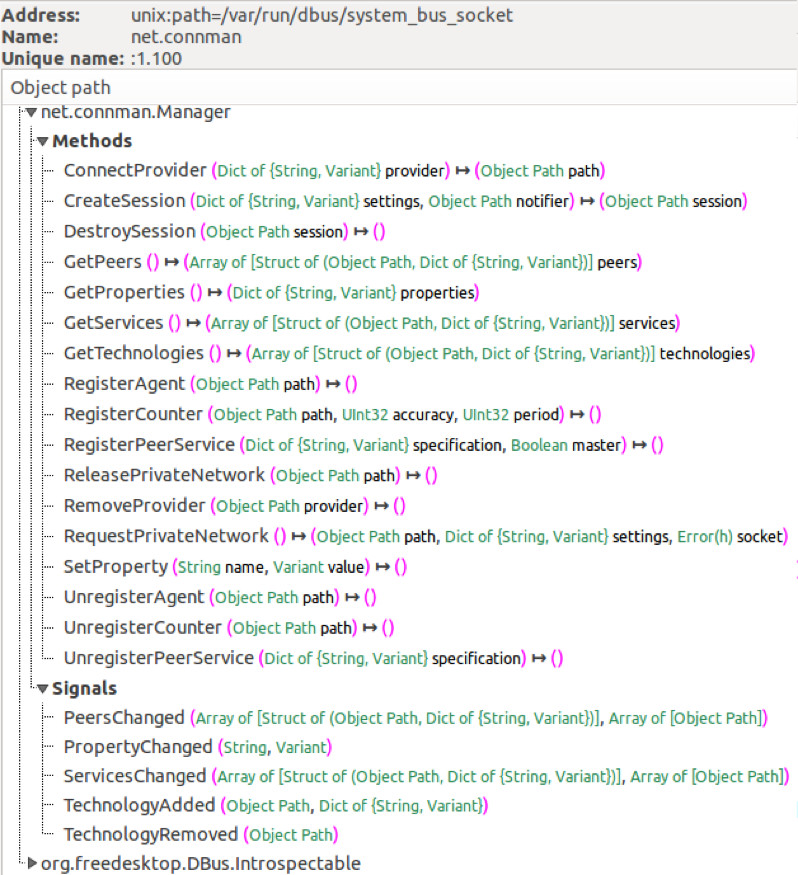
- The main entry point is via the manager object.
- Manager object contains the references (interfaces) to service object.
- Other interfaces include VPN, clock, task, technology, session, notification, peer, agent, and counter.

Manager D-Bus interface
- Applications entry point is the manager object
- All methods and properties are explained
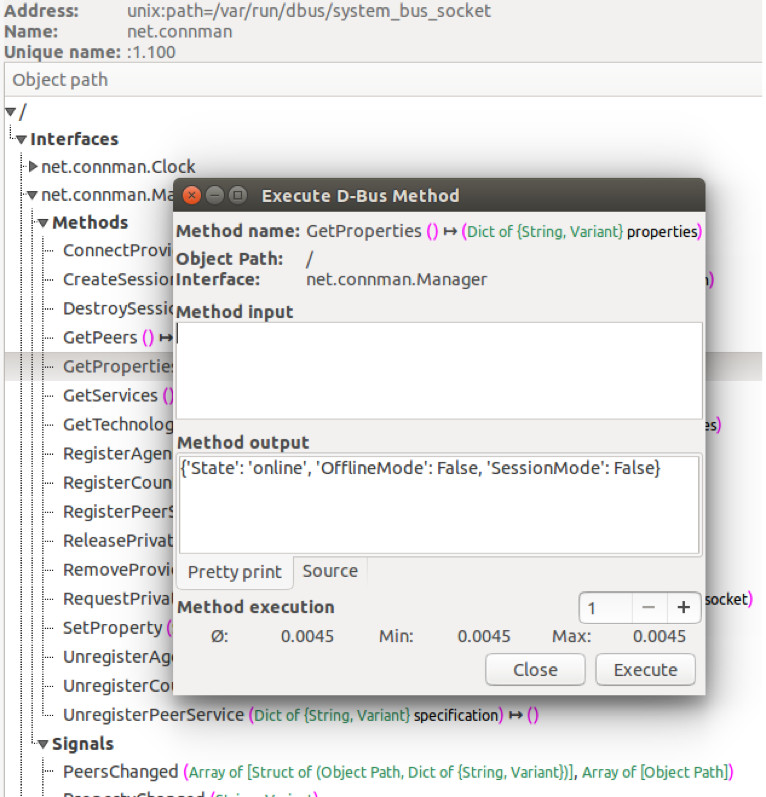
Manager properties
A simple way to retrieve all global properties looks like this:
- bus = dbus.SystemBus()
- manager = dbus.Interface(bus.get_object("net.connman", "/"), "net.connman.Manager")
- properties = manager.GetProperties()
Changing a global property is also pretty simple. For example, enabling the so called offline mode (AKA flight mode) is enough to just set that property: manager.SetProperty("OfflineMode", dbus.Boolean(1)).
Service interface
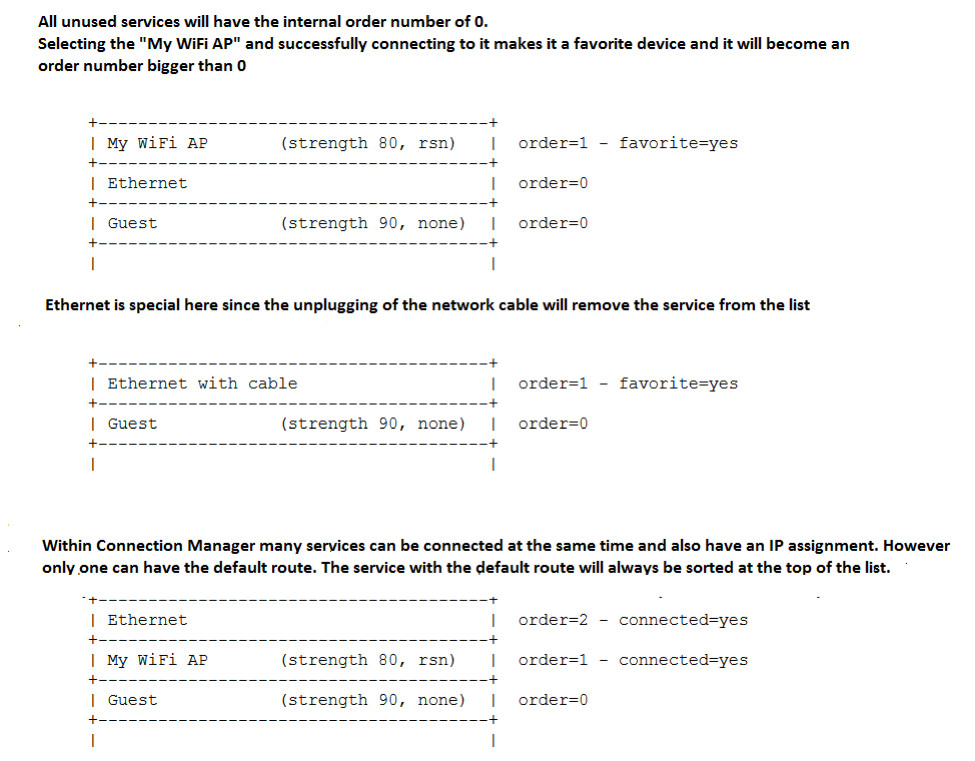
The advanced interface gives the user interface easy access to networking details and user chosen preferences. This is the service list and interface. ConnMan maintains a single flat and sorted list of all available services.

Service order
Service states
- The basic state of every service is "idle". This means that this service is not in use at all at the moment. It also is not attempting to connect or do anything else.
- The "association" state indicates that this service tries to establish a low-level connection to the network – for example, associating/connecting with a WiFi access point.
- With the "configuration" state, the service indicates that it is trying to retrieve/configure IP settings.
- The "ready" state signals a successful connected device. This doesn't mean it has the default route, but basic IP operations will succeed.
- With the "disconnect" state a service indicates that it is going to terminate the current connection and will return to the "idle" state.
- In addition a "failure" state indicates a wrong behavior. It is similar to the "idle" state since the service is not connected.

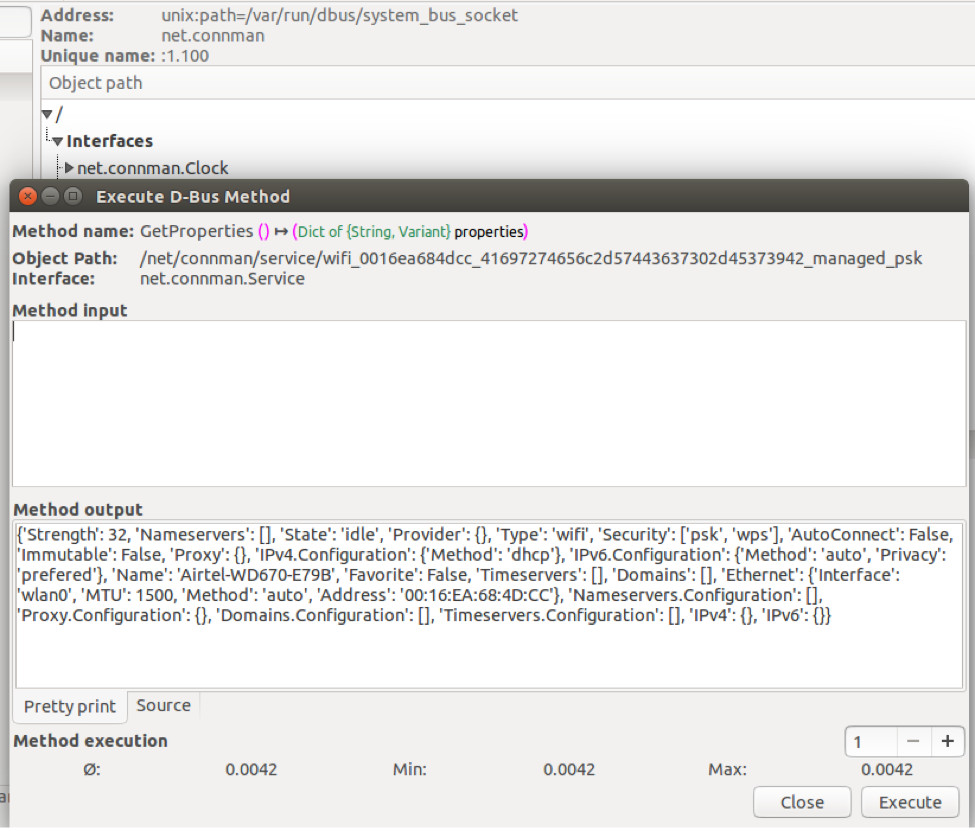
Service D-Bus interface
Here's how to get a service object:
-properties = manager.GetProperties()
-for path in properties["Services"]:
service = dbus.Interface(bus.get_object("net.connman", path), "net.connman.Service")
It also contains method to connect or disconnect a specific service. ConnMan can also auto-connect services based on his policies or via external events (like plugging in an Ethernet cable). Connecting (or disconnecting) a specific service manually is as simple as just telling it to.
connect: service.Connect() or service.Disconnect()

Service properties
Technology interface
A basic device configuration task is done by technology interface. For example, switching a device on and off (via RFKILL for example) should be done via the technology interface.
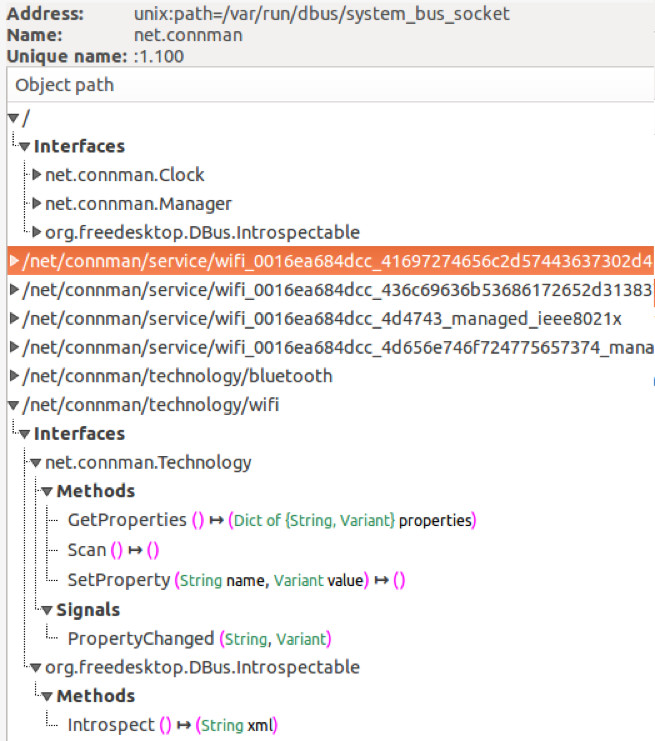
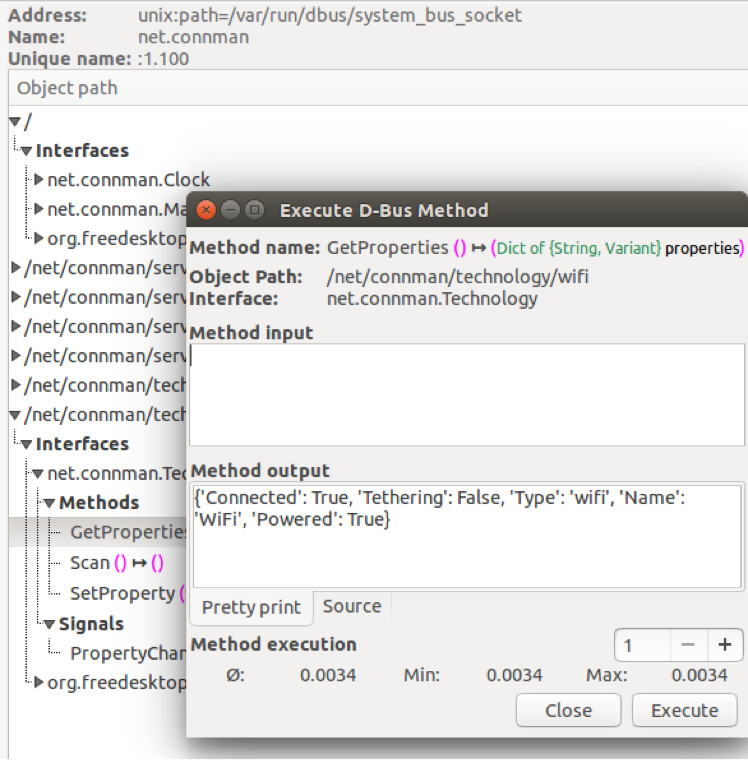
Technology properties
A user can activate offline (flight) mode via Manager OfflineMode property. While in offline mode, all the technologies including ethernet are powered off. During the offline mode, the user can temporarily activate individual technologies by Technology Powered property by using the rfkill command or by the Fn-Fx key combination found in some laptops.
Connman internals
Starting connmand
Options:
-c, --config=FILE             Load the specified configuration file instead of /usr/local/etc/connman/main.conf
-d, --debug=DEBUG             Specify debug options to enable
-i, --device=DEV              Specify networking device or interface
-I, --nodevice=DEV            Specify networking interface to ignore
-p, --plugin=NAME,...         Specify plugins to load
-P, --noplugin=NAME,...       Specify plugins not to load
-W, --wifi=NAME               Specify driver for WiFi/Supplicant
-n, --nodaemon                Don't fork daemon to background
-r, --nodnsproxy              Don't enable DNS Proxy
--nobacktrace                 Don't print out backtrace information
Example usage:
# CONNMAN_SUPPLICANT_DEBUG=1 connmand -n -d &> connman.log
#connmand -i wlan0 -I eth0 --nodnsproxy --nodaemon >& connman.log
Main configuration file
main.conf
InputRequestTimeout = 120 (default)---------> input request ( ex. passphrase) timeout
BrowserLaunchTimeout = 300 ( default) -----> The request for launching a browser for portal pages
BackgroundScanning = true --------------------> option for background scanning
FallbackTimeservers = --------------------------> List of fallback timeservers ( used by NTP sync) separated by ","
FallbackNameservers = -------------------------> List of fallback nameservers
DefaultAutoConnectTechnologies = -----------> List of technologies that are marked autoconnectable by default.
PreferredTechnologies = ------------------------> List of preferred technologies from - most preferred one to least preferred
NetworkInterfaceBlacklist = vmnet,vboxnet,virbr,ifb,ve-,vb-   ---> List of blacklisted network interfaces
AllowHostnameUpdates = true -----------------> Allow connman to change the system hostname ( ex. dhcp hostname option)
SingleConnectedTechnology = false -----------> Keep only a single connected technology at any time
TetheringTechnologies = wifi,bluetooth,gadget
PersistentTetheringMode = false --------------> Restore earlier tethering status when returning from offline mode
Enable6to4 = false ------------------------------> Automatically enable Anycast 6to4 if possible (not recommended. see RFC6343 )
EnableOnlineCheck = false --------------------> Enable use of http get as on online status check
AlwaysConnectedTechnologies = -------------> List of technologies with AutoConnect = true which are always connected regardless of PreferredTechnologies setting
Connman configuration file
Connman uses configuration files to provision existing services. Connman will be looking for its configuration files at /var/lib/connman/. Configuration file names must not include other characters than letters or numbers and must have a .config suffix.
Ex.      #cat /var/lib/connman/example.config
[global]
Name = Example
Description = Example network configuration

[service_home_ethernet]
Type = ethernet
IPv4 = 192.168.1.42/255.255.255.0/192.168.1.1
IPv6 = 2001:db8::42/64/2001:db8::1
MAC = 01:02:03:04:05:06
Nameservers = 10.2.3.4,192.168.1.99
SearchDomains = my.home,isp.net
Timeservers = 10.172.2.1,ntp.my.isp.net
Domain = my.home

[service_home_wifi]
Type = wifi
Name = my_home_wifi
Passphrase = secret
IPv4 = 192.168.2.2/255.255.255.0/192.168.2.1
MAC = 06:05:04:03:02:01
Settings
Settings and profiles are automatically created for networks the user connects to often.
# cat /var/lib/connman/settings

[global]

OfflineMode=false


[WiFi]

Enable=true

Tethering=false


[Bluetooth]

Enable=false

Tethering=false
Profile settings are stored in directories under /var/lib/connman/ by their service name. VPN settings can be found in /var/lib/connman-vpn/.
Writing plug-ins
The basic plugin contains of plugin description via CONNMAN_PLUGIN_DEFINE and also init/exit callbacks defined through that description.
#includestatic int example_init(void) { return 0; } static void example_exit(void) { } CONNMAN_PLUGIN_DEFINE(example, "Example plugin", CONNMAN_VERSION, example_init, example_exit)
Plug-ins interact with the core functionality of ConnMan using technology, network and device, and other infrastructures. Here is the technology infrastructure:
ex. bluetooth plugin
	static struct connman_technology_driver tech_driver = {
		.name           = "bluetooth",
		.type           = CONNMAN_SERVICE_TYPE_BLUETOOTH,
		.probe          = bluetooth_tech_probe,
		.remove         = bluetooth_tech_remove,
		.set_tethering  = bluetooth_tech_set_tethering,
	};
To make the Connection Manager aware of the new Technology plugin, we need to register its driver by calling connman_technology_driver_register().
connman_technology_driver_register(&tech_driver);
Device infrastructure
A Device represents a real device of a given Technology. There could be many devices per technology.
static struct connman_device_driver device_driver = {
		.name           = "bluetooth",
		.type           = CONNMAN_DEVICE_TYPE_BLUETOOTH,
		.probe          = bluetooth_device_probe,
		.remove         = bluetooth_device_remove,
		.enable         = bluetooth_device_enable,
		.disable        = bluetooth_device_disable,
	};
To register the driver:
connman_device_driver_register(&device_driver);
Additionally, code to handle the detection of new devices needs to be written for each plugin; the Bluetooth plugin does so by registering watchers for the BlueZ D-Bus interface. Once a new Bluetooth Device appears, the plugin needs to notify ConnMan core by calling connman_device_create(). For the Bluetooth plugin, the call would be:
struct connman_device *device;
 device = connman_device_create("bluetooth", CONNMAN_DEVICE_TYPE_BLUETOOTH)
Network infrastructure
The Connection Manager provides a means for plugins to handle the specifics of establishing/handling a connection for each type of Technology. For the Bluetooth plugin, a connman_network_driver needs to be registered:
	static struct connman_network_driver network_driver = {
		.name           = "bluetooth",
		.type           = CONNMAN_NETWORK_TYPE_BLUETOOTH_PAN,
		.probe          = bluetooth_pan_probe,
		.remove         = bluetooth_pan_remove,
		.connect        = bluetooth_pan_connect,
		.disconnect     = bluetooth_pan_disconnect,
	};
Then, call the register function:
connman_network_driver_register(&network_driver);
Connman source files/infrastructure
Init functions will be called in src/main.c before running main loop.
src/util.c - /dev/urandom support
src/inotify.c - used by the core (config.c) and the session policy plugin
src/technology.c – used for technology interface
src/notifier.c – basic notifier infrastructure
src/agent.c – agent interface
src/service.c – used for service interface
src/peer_service.c – p2p peer service API
src/peer.c – p2p peer object’s core logic
src/provider.c – provider infrastructure
src/network.c – network infrastructure used by plug-ins
src/config.c – framework for configuration files
src/device.c – device infrastructure used by plug-ins
src/iptables.c – iptables support (netfilter chains and rules)
src/firewall-iptables.c, nftables.c (older firewall.c) – firewall infrastructure.
src/nat.c – used for NAT
src/tethering.c  – tethering infrastructure
src/manager.c – Manager interface
src/stats.c – used for storing service stats ( mmaped into memory)
src/ipconfig.c – IP configuration framework
src/rtnl.c – netlink support
src/session.c – Allows 3rd party applications to request a network session
src/resolver.c – resolver framework
src/dhcp.c, dhcpv6.c – dhcp framework
src/rfkill.c – rfkill interface support
src/machine.c -  basic systemd-hostnamed ( machine-type- “chassis”) support
Connmanctl
ConnMan has a standard command line client connmanctl. It can run in 2 modes:
- In command mode, commands are entered as arguments to connmanctl command, just like systemctl.
- Interactive mode is started by typing connmanctl without arguments. Prompt will change to connmanctl> to indicate it is waiting for user commands, just like python interactive mode.
Connmanctl examples
Example 1. Enabling and disabling WiFi
$ connmanctl technologies - check for the line that says Powered: True/False.
$ connmanctl enable wifi - To power the wifi on.
$ connmanctl disable wifi – To power off the wifi.
Other ways to enable wifi could include - ip link set
Example 2. Connecting to an open access point
The commands in this section show how to run connmanctl in command mode. To scan the network connmanctl accepts simple names called technologies. To scan for nearby WiFi networks:
$ connmanctl scan wifi To list the available networks found after a scan run (example output):
$ connmanctl services
*AO MyNetwork wifi_dc85de828967_68756773616d_managed_psk OtherNET wifi_dc85de828967_38303944616e69656c73_managed_psk AnotherOne wifi_dc85de828967_3257495245363836_managed_wep FourthNetwork wifi_dc85de828967_4d7572706879_managed_wep AnO6penNetwork wifi_dc85de828967_4d6568657272696e_managed_none
$ connmanctl connect wifi_dc85de828967_4d6568657272696e_managed_none
You should now be connected to the network. Check using ip addr or connmanctl state.
Example 3. Connecting to a protected access point
For protected access points, provide some information to the ConnMan daemon, at the very least a password or a passphrase.
$ connmanctl
connmanctl> scan wifi ----- To list services:
connmanctl> services
connmanctl> agent on --- register the agent to handle user requests.
connmanctl> connect wifi_dc85de828967_38303944616e69656c73_managed_psk
The agent asks for more information depending on the type of network you are connecting to. The agent will also print additional data about the information it needs as shown in the example below.
Agent RequestInput wifi_dc85de828967_38303944616e69656c73_managed_psk Passphrase = [ Type=psk, Requirement=mandatory ] Passphrase?
Provide the information requested, in this example the passphrase, and then type:
connmanctl> quit
If the information you provided is correct, you should now be connected to the protected access point.
Other Connmanctl usages:
Technologies
Various hardware interfaces are referred to as Technologies by ConnMan. To list available technologies, run:
$ connmanctl technologies
Technologies can be toggled on/off with:
$ connmanctl enable technology_type

$ connmanctl disable technology_type
For example, to toggle off WiFi:
$ connmanctl disable wifi
ConnMan test scripts
Connman also provides basic python scripts (ex. test-connman, list-services etc). Basic operations like connect, disconnect, autoconnect, services, scan, enable, disable, offlinemode, state, etc. are supported via these scripts.
Connman debugging
Activating debugging
We can activate debugging prints in ConnMan using the -d command line option.
-d Activate all normal debug prints
-d src/service.c This prints debugging info from src/service.c file only
-d src/network.c:src/ipconfig.c This activates debug prints in src/network.c and src/ipconfig.c files.
-d 'src/n*.c' This would activate debug print from all the C source files starting with letter 'n' in src directory. Note the quotation marks around option, that is to prevent shell expansion.
-d '*/n*.c:*/i*.c' Activate debug prints for all C source files starting with letters 'n' or 'i' in any sub-directory.
Sub-Component debugging
Some components of ConnMan have environment variable activated debug prints. If the environment variable is set, then corresponding component will print some extra debugging information.
The following environment variables can be used:
- CONNMAN_DHCP_DEBUG: DHCPv4 related debug information
- CONNMAN_DHCPV6_DEBUG: DHCPv6 related debug information
- CONNMAN_IPTABLES_DEBUG: Extra information when iptables is used
- CONNMAN_RESOLV_DEBUG: Name resolver debug prints. These debug prints are used when ConnMan resolves host names for its own use. Note that the DNS proxy debug prints do not use this environment variable. For that, one can use "-d src/dnsproxy.c" command line option.
- CONNMAN_SUPPLICANT_DEBUG : Debugging prints for communication between connmand and wpa_supplicant processes.
- v CONNMAN_WEB_DEBUG: Debug information when ConnMan does Internet connectivity check in Wispr and 6to4 components.
Example:
CONNMAN_SUPPLICANT_DEBUG=1 src/connmand -n
Example: Get CONNMAN_IPTABLES_DEBUG logs
Ensure iptables support is enabled in kernel:
#zcat /proc/config.gz | grep "CONFIG_IP_NF_IPTABLES"
Iptables must be enabled in kernel:
CONFIG_IP_NF_IPTABLES=m or CONFIG_IP_NF_IPTABLES=y
Clear all iptable filters:
# iptables –F
Set below iptable rules to filter ICMP packets (input, output, and forward packets):
# iptables -t filter -A INPUT -p icmp --icmp-type echo-request -j LOG --log-prefix="filter INPUT:"

# iptables -t filter -A INPUT -p icmp --icmp-type echo-reply -j LOG --log-prefix="filter INPUT:“

# iptables -t filter -A OUTPUT -p icmp --icmp-type echo-request -j LOG --log-prefix="filter OUTPUT:“

# iptables -t filter -A OUTPUT -p icmp --icmp-type echo-reply -j LOG --log-prefix="filter OUTPUT:“

# iptables -t filter -A FORWARD -p icmp --icmp-type echo-request -j LOG --log-prefix="filter FORWARD:“

# iptables -t filter -A FORWARD -p icmp --icmp-type echo-reply -j LOG --log-prefix="filter FORWARD:"
Export below environment variable to enable ConnMan’s iptables debug:
# export CONNMAN_IPTABLES_DEBUG=1
Start Connmand Connection Manager with debug option enabled:
# /usr/sbin/connmand -d -n -I eth0
ConnMan daemon message logs should be displayed whenever an ICMP packet is involved.