
For the Professional Maker: What you need to know about going to production with a Raspberry-Pi-based design
June 01, 2018
Blog

So you?ve been experimenting with the Raspberry Pi single-board computer for years, and you've finally come up with an application that others would be willing to pay for.
So you’ve been experimenting with the Raspberry Pi single-board computer for years, and you've finally come up with an application that others would be willing to pay for. Sure, friends and family love the one gadget you show off at your house, or even the second and third that you let them borrow, but how do you take this limited design to the wider world?
When you consider designs based on the Raspberry Pi, there seem to be two very broad categories: those that expect users to tinker with the design and those that simply plug in and run, with perhaps some software configuration. In the first scenario, such as the pi-top Raspberry Pi-powered laptop, you can—and likely should—use a stock Raspberry Pi. This allows the user to easily setup and modify how the device acts, and you can even let them provide their own Pi, reducing your inventory needs.
If, however, your product is meant to simply plug in as an appliance, your options—and thus potential complications—opens up dramatically. One option would be to pre-program a Raspberry Pi or Pi Zero with your own custom PCB, adding hardware and electronics as needed. This give you and the user a lot of flexibility, but programming and assembly would soon become cumbersome as volumes increase. Another option would be to use the Raspberry Pi compute module, which houses the guts of the Raspberry Pi 3, along with 4GB of eMMC flash memory, in a package that fits into a standard DDR2 SODIMM connector (a Lite version allows users to connect either eMMC memory or an SD card). While it doesn’t come with any USB or Ethernet connectors, nor does it feature wireless connectivity, you can add only what you need to a custom carrier board. This format also gives you access to many more GPIO connections than are available on a standard Pi, and there’s even an IO Board development kit available to help you verify a design.
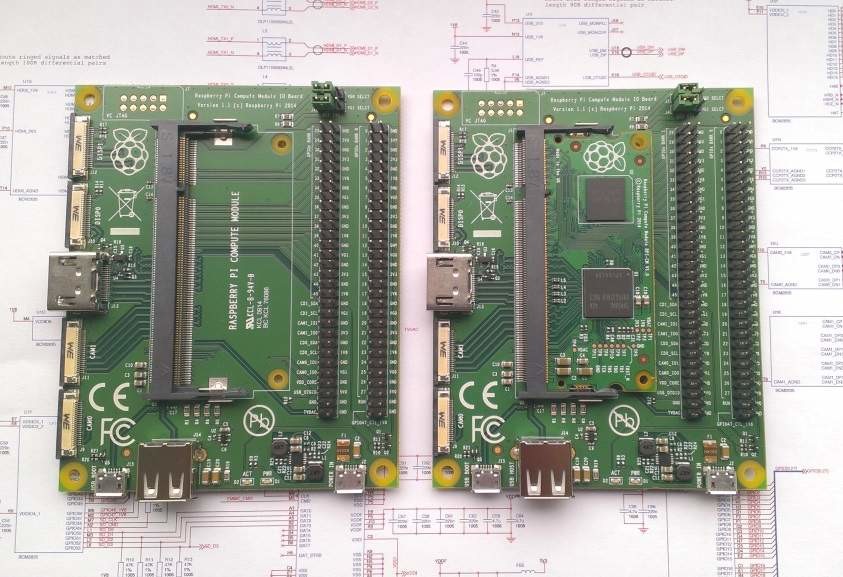
[The Raspberry Pi Compute Module. Image by Raspberry Pi Foundation, CC BY-SA 4.0, via Wikimedia Commons]
A third option is to customize a standard Pi to your needs via element14’s Raspbery Pi customization service. This allows you to strip off unneeded parts, reconfigure the board, and add extra functionality as needed. So, for example, if your design needs a Zigbee interface and a RTC module, this can be added to the Pi-based board that you receive from the factory, greatly simplifying your assembly process. While this service can be very helpful, one thing to keep in mind is that it also requires a minimum order of between 3,000 and 5,000 boards. This upfront expense will be difficult to swallow if you’re not entirely sure about product demand.
While these are great options for getting the Pi portion of your design squared away, you also need to consider any other electronics or boards that are needed to get your device to function, as well as a mechanical enclosure, connectors and other needed accessories. Depending on you and your team’s expertise, this may require enlisting an industrial design consultancy to get things just right.
What’s discussed here doesn’t even consider the fact that you’ll need to actually sell the items and ship them to your customers, requiring time, effort, and money. While its tempting to think that your work is done after a successful prototype, if want to sell it to the masses, things may actually just be beginning. For that matter, while you might have a selling price for your item bouncing around in your head based on a prototype, consider that there is much more expense that goes into mass production than just banging one together in your garage. Be sure to consider everything (and perhaps even add a fudge factor) before committing to a selling price. You can always discount later!
Resources:
Customization service:
- https://techcrunch.com/2015/10/28/custom-pi/
- https://www.rs-online.com/designspark/ive-got-a-prototype-what-next
- https://www.raspberrypi.org/blog/starting-a-business-with-a-raspberry-pi/
- https://www.electronicsweekly.com/uncategorised/raspberry-pi-can-be-designed-into-money-making-products-2015-12/
- https://www.youtube.com/watch?v=z_CbNqfa84Y
- Tingbot
- Slice (media player – uses a Pi compute module)
- Brick Pi – adapts the Pi to LEGO bricks
- Flotilla
- Mycroft


